1. Create a Simple Agrest App
In this chapter, we set up a minimal environment to build an Agrest-based application.
1.3. The resulting application
The final application is available at from GitHub
1.4. Starting a project
In this chapter, we create a new Java project in IntelliJ IDEA and introduce a simple Bookstore application that will be used as an example.
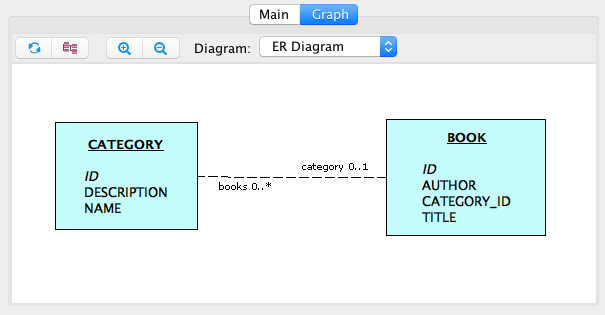
1.4.1. Define a Bookstore Domain Model
The application contains two types of entities: Category and Book.
The relationship between Category and Book entities is one-to-many.
1.4.2. Create a new Project in IntelliJ IDEA
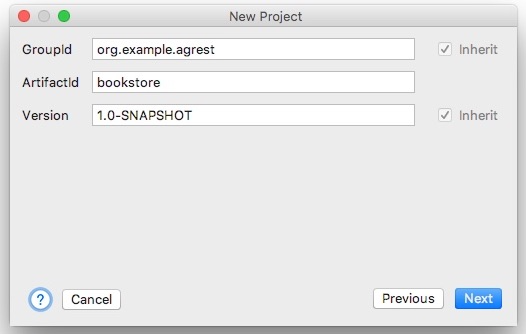
In IntelliJ IDEA, select File > New > Project... Then select Maven and click Next.
In the dialog shown on the screenshot below, fill in the Group Id
and Artifact Id fields and click Next.
During the next step, you will be able to customize the directory for your project.
Click Finish where you are done. Now you should have a new empty project.
1.4.3. Configure Maven pom.xml
Add the following dependencies:
<dependency>
    <groupId>io.agrest</groupId>
    <artifactId>agrest</artifactId>
    <version>4.9</version>
</dependency>

<dependency>
    <groupId>org.glassfish.jersey.containers</groupId>
    <artifactId>jersey-container-servlet-core</artifactId>
    <version>2.35</version>
</dependency>
<dependency>
    <groupId>org.glassfish.jersey.inject</groupId>
    <artifactId>jersey-hk2</artifactId>
    <version>2.35</version>
</dependency>

<dependency>
    <groupId>org.apache.derby</groupId>
    <artifactId>derby</artifactId>
    <version>10.15.2.0</version>
</dependency>
Configure a jetty Maven plugin to start app using mvn jetty:run command
<plugin>
    <groupId>org.eclipse.jetty</groupId>
    <artifactId>jetty-maven-plugin</artifactId>
    <version>10.0.7</version>
    <configuration>
        <scanIntervalSeconds>5</scanIntervalSeconds>
        <classesDirectory>${project.basedir}/target/classes</classesDirectory>
        <supportedPackagings><supportedPackaging>jar</supportedPackaging></supportedPackagings>
    </configuration>
</plugin>
1.5. Implementation
In this chapter, we implement a simple application to demonstrate Agrest features.
The application uses Cayenne as an ORM framework and for further information
regarding a DB mapping please, refer to Apache Cayenne ORM
1.5.1. Configure Cayenne
In the application’s resources folder, create a Cayenne project file:
cayenne-project.xml
<?xml version="1.0" encoding="utf-8"?>
<domain project-version="9">
    <map name="datamap"/>

    <node name="datanode"
          factory="org.apache.cayenne.configuration.server.XMLPoolingDataSourceFactory"
          schema-update-strategy="org.apache.cayenne.access.dbsync.CreateIfNoSchemaStrategy"
    >
        <map-ref name="datamap"/>
        <data-source>
            <driver value="org.apache.derby.iapi.jdbc.AutoloadedDriver"/>
            <url value="jdbc:derby:memory:testdb;create=true"/>
            <connectionPool min="1" max="1"/>
            <login/>
        </data-source>
    </node>
</domain>
In the same folder, add a file that contains a basic Cayenne mapping. The mapping is done based on the ER diagram from the Starting a project charter:
datamap.map.xml
<?xml version="1.0" encoding="utf-8"?>
<data-map xmlns="http://cayenne.apache.org/schema/9/modelMap"
          xmlns:xsi="http://www.w3.org/2001/XMLSchema-instance"
          xsi:schemaLocation="http://cayenne.apache.org/schema/9/modelMap https://cayenne.apache.org/schema/9/modelMap.xsd"
          project-version="9">
    <property name="defaultPackage" value="org.example.agrest.persistent"/>
    <db-entity name="BOOK">
        <db-attribute name="AUTHOR" type="VARCHAR" length="128"/>
        <db-attribute name="CATEGORY_ID" type="INTEGER"/>
        <db-attribute name="ID" type="INTEGER" isPrimaryKey="true" isMandatory="true"/>
        <db-attribute name="TITLE" type="VARCHAR" isMandatory="true" length="128"/>
    </db-entity>
    <db-entity name="CATEGORY">
        <db-attribute name="DESCRIPTION" type="NCLOB"/>
        <db-attribute name="ID" type="INTEGER" isPrimaryKey="true" isMandatory="true"/>
        <db-attribute name="NAME" type="VARCHAR" isMandatory="true" length="128"/>
    </db-entity>
    <obj-entity name="Book" className="org.example.agrest.persistent.Book" dbEntityName="BOOK">
        <obj-attribute name="author" type="java.lang.String" db-attribute-path="AUTHOR"/>
        <obj-attribute name="title" type="java.lang.String" db-attribute-path="TITLE"/>
    </obj-entity>
    <obj-entity name="Category" className="org.example.agrest.persistent.Category" dbEntityName="CATEGORY">
        <obj-attribute name="description" type="java.lang.String" db-attribute-path="DESCRIPTION"/>
        <obj-attribute name="name" type="java.lang.String" db-attribute-path="NAME"/>
    </obj-entity>
    <db-relationship name="category" source="BOOK" target="CATEGORY" toMany="false">
        <db-attribute-pair source="CATEGORY_ID" target="ID"/>
    </db-relationship>
    <db-relationship name="books" source="CATEGORY" target="BOOK" toMany="true">
        <db-attribute-pair source="ID" target="CATEGORY_ID"/>
    </db-relationship>
    <obj-relationship name="category" source="Book" target="Category" deleteRule="Nullify" db-relationship-path="category"/>
    <obj-relationship name="books" source="Category" target="Book" deleteRule="Deny" db-relationship-path="books"/>
</data-map>
1.5.2. Define domain models
Create two classes to present data objects in package org.example.agrest.persistent:
public class Category extends CayenneDataObject {

    public static final String ID_PK_COLUMN = "ID";

    public static final Property<String> DESCRIPTION = Property.create("description", String.class);
    public static final Property<String> NAME = Property.create("name", String.class);
    public static final Property<List<Book>> BOOKS = Property.create("books", List.class);
}
public class Book extends CayenneDataObject {
public static final String ID_PK_COLUMN = "ID";
public static final Property<String> AUTHOR = Property.create("author", String.class);
public static final Property<String> TITLE = Property.create("title", String.class);
public static final Property<Category> CATEGORY = Property.create("category", Category.class);
}1.5.3. Implement Agrest application classes
Create an application and a resource class in package org.example.agrest:
@ApplicationPath("/api/*")
public class Application extends ResourceConfig {

    public Application() {

        ServerRuntime cayenneRuntime = ServerRuntime.builder()
            .addConfig("cayenne-project.xml")
            .build();

        AgRuntime agRuntime = AgBuilder.build(cayenneRuntime);
        super.register(agRuntime);

        packages("org.example.agrest");
    }
}
@Path("category")
@Produces(MediaType.APPLICATION_JSON)
public class CategoryResource {
@Context
private Configuration config;
@POST
public SimpleResponse create(String data) {
return Ag.create(Category.class, config).sync(data);
}
@GET
public DataResponse<Category> getAll(@Context UriInfo uriInfo) {
return Ag.select(Category.class, config).uri(uriInfo).get();
}
}1.5.4. Configure web.xml
Provide a servlet configuration and a mapping based on the application class that you already created.
<?xml version="1.0" encoding="UTF-8"?>
<web-app xmlns="http://xmlns.jcp.org/xml/ns/javaee"
xmlns:xsi="http://www.w3.org/2001/XMLSchema-instance"
xsi:schemaLocation="http://xmlns.jcp.org/xml/ns/javaee http://xmlns.jcp.org/xml/ns/javaee/web-app_3_1.xsd"
metadata-complete="false"
version="3.1">
<servlet>
<servlet-name>api</servlet-name>
<servlet-class>org.glassfish.jersey.servlet.ServletContainer</servlet-class>
<init-param>
<param-name>javax.ws.rs.Application</param-name>
<param-value>org.example.agrest.Application</param-value>
</init-param>
</servlet>
<servlet-mapping>
<servlet-name>api</servlet-name>
<url-pattern>/api/*</url-pattern>
</servlet-mapping>
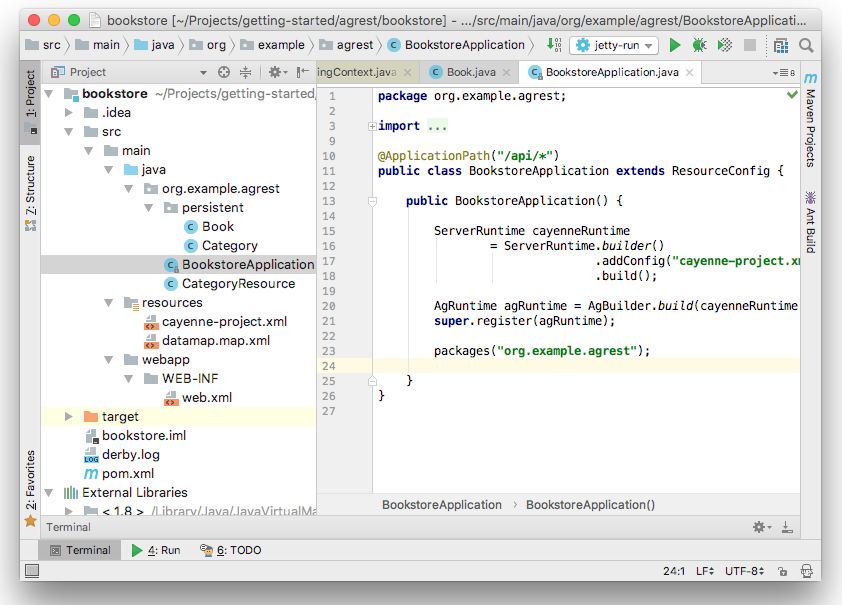
</web-app>1.6. Running the Application
In this chapter, we run and test our application. After you have completed the above steps, the structure of your project will look like this:
1.6.1. Building and running
To build the application, use the mvn clean install command.
To run a jetty server with our application, use the mvn jetty:run command.
1.6.2. Configure IntelliJ IDEA Maven plugin
To run the application using IDE, add a new Maven configuration on a menu path Run → Edit Configurations….
Then set a Name: (e.g. Bookstore) and a Command line: in jetty:run
1.6.3. Testing
After running the application, you can call this endpoint to get a list of categories:
curl -i -X GET 'http://localhost:8080/api/category'And get the following response:
HTTP/1.1 200 OK
Date: Wed, 03 Oct 2018 10:14:51 GMT
Content-Type: application/json
Content-Length: 21
Server: Jetty(9.3.14.v20161028)

{"data":[],"total":0}
As you may see, the list is empty. So, use the 'POST' command to add some categories:
curl -i -X POST 'http://localhost:8080/api/category' -d '{"id":"1","name":"Science Fiction"}'Repeat the command, if necessary:
curl -i -X POST 'http://localhost:8080/api/category' -d '{"id":"2","name":"Horror"}'The response will be:
HTTP/1.1 201 Created
Date: Wed, 03 Oct 2018 10:42:17 GMT
Content-Type: application/json
Content-Length: 16
Server: Jetty(9.3.14.v20161028)

{"success":true}
Now make the 'GET' request again and you will receive the following:
HTTP/1.1 200 OK
Date: Wed, 03 Oct 2018 10:44:44 GMT
Content-Type: application/json
Content-Length: 117
Server: Jetty(9.3.14.v20161028)

{"data":[{"id":1,"description":null,"name":"Science Fiction"},{"id":2,"description":null,"name":"Horror"}],"total":2}